2002 Ski-Doo Shop Manual Volume Two, Page 113Get this manual
Section 04 ENGINE Subsection 02 (809 ENGINE TYPE)
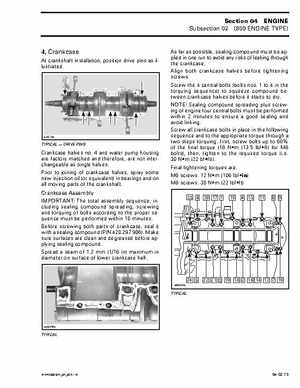
4, Crankcase
At crankshaft installation, position drive pins as illustrated
A30C1VA
TYPICAL DRIVE PINS
Crankcase halves no4 and water pump housing are factory matched and therefore, are not interchangeable as single halvesPrior to joining of crankcase halves, spray some new injection oil (or equivalent) in bearings and on all moving parts of the crankshaftCrankcase Assembly IMPORTANT: The total assembly sequence, including sealing compound spreading, screwing and torquing of bolts according to the proper sequence must be performed within 10 minutesBefore screwing both parts of crankcase, seal it with sealing compound (PN 420 297 906)Make sure surfaces are clean and degreased before applying sealing compoundSpread seam of 1.2 mm (116 in) maximum in diameter on surface of lower crankcase half
As far as possible, sealing compound must be applied in one run to avoid any risks of leaking through the crankcaseAlign both crankcase halves before tightening screwsScrew the central bolts (bolts nos1 to in the torquing sequence) to squeeze compound between crankcase halves before it starts to dryNOTE: Sealing compound spreading plus screwing of engine four central bolts must be performed within minutes to ensure good sealing and avoid linkingScrew all crankcase bolts in place in the following sequence and to the appropriate torque through two steps torquing: first, screw bolts up to 60 of the final torque (18 Nm (13.5 lbfft) for M8 bolts), then, tighten to the required torque (i.e30 Nm (22 bfft))Final tightening torques are: M6 screws: 12 Nm (106 Ibfin) M8 screws: 30 Nm (22 Ibfft)