2002 Ski-Doo Shop Manual Volume One, Page 125Get this manual
Section 04 ENGINE Subsection 03 (443 AND 503 ENGINE TYPES)
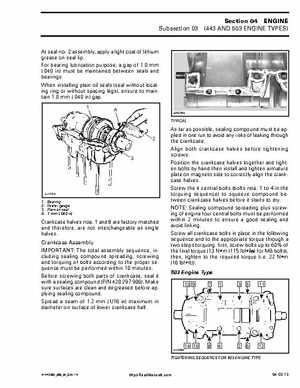
At seal no2 assembly, apply light coat of lithium grease on seal lipFor bearing lubrication purpose, gap of 1.0 mm (.040 in) must be maintained between seals and bearingsWhen installing plain oil seals (seal without locating ring or without spacing legs), ensure to maintain 1.0 mm (.040 in) gap1 A
A30C2WA
TYPICAL
A17C07A
Bearing Feeler gauge Plain oil seal mm (.040 in)
Crankcase halves nos1 and are factory matched and therefore, are not interchangeable as single halvesCrankcase Assembly IMPORTANT: The total assembly sequence, including sealing compound spreading, screwing and torquing of bolts according to the proper sequence must be performed within 10 minutesBefore screwing both parts of crankcase, seal it with sealing compound (PN 420 297 906)Make sure surfaces are clean and degreased before applying sealing compoundSpread seam of 1.2 mm (116 in) maximum in diameter on surface of lower crankcase half
As far as possible, sealing compound must be applied in one run to avoid any risks of leaking through the crankcaseAlign both crankcase halves before tightening screwsPosition the crankcase halves together and tighten bolts by hand then install and tighten armature plate on magneto side to correctly align the crankcase halvesScrew the central bolts (bolts nos1 to in the torquing sequence) to squeeze compound between crankcase halves before it starts to dryNOTE: Sealing compound spreading plus screwing of engine four central bolts must be performed within minutes to ensure good sealing and avoid linkingScrew all crankcase bolts in place in the following sequence and to the appropriate torque through two steps torquing: first, screw bolts up to 60 of the final torque (13 Nm (115 lbfin) for M8 bolts), then, tighten to the required torque (i.e22 Nm (16 lbfft))503 Engine Type