Suzuki outboard motors 1988 2003 repair manual., Page 318Get this manual
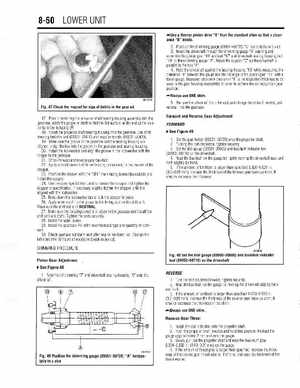
8-50 LOWER UNIT Use thinner pinion shim "9" than the standard shim so that clearance "B" exists2Position the shimming gauge (09951-08720) "A"horizontally in vice3Insert the driveshaft through the shimming gaugeopening and assemble the pinion gear "16" and nut "17" and driveshaft bearing housing boltto the shimming gaugeAdjust the support "C" so the driveshaft is parallel to the tool4Hold the driveshaft against the bearing housing "10" while measuring the clearance "B" between the gauge and the flat edge of the pinion gearwith feeler gaugeMeasured clearance plus shimis the total shim thickness to be used in the gear housing reassembly in order to achieve the correct pinion gear position Always use ONE shimFig47 Check the magnet for sign of debris in the gear oil
5Remove the driveshaft from the tool, and change the shim if needed, and reinstall into the gearcase Forward and Reverse Gear Adjustment
17Prior to installing the propeller shaftlbearing housing assembly into the gearcase, rotate the propeller shaft so that the flat surface on the end of the horizontal slider is facing UP18Install the propeller shaftlbearing housing into the gearcaseUse shaft housing installer tool (09922-59410) and installer handle (09922-59420)19Make sure the groove in the gearcase and the bearing housing are alignedInstall the key into the groove in the gearcase and bearing housing20Install the lockwasher and align the groove in the lockwasher with the tongue in the gearcase21Check forward and reverse gear backlash22Apply small amount of thread locking compound, to the threads of the stopper23Position the stopper with the "OFF" mark facing toward the outside and install the stopper24Use the same special tool used to remove the stopper and tighten the stopper to specificationIf necessary, slightly tighten the stopper until it is aligned with the lockwasher25Bend down the lockwasher tab to lock the stopper in place26Apply waterproof marine grease to the O-ring seal on the shift unitMake sure the shift rod is in NEUTRAL27Make sure the locating dowel is in place in the gearcase and install the shift unit and boltsTighten the bolts securely28Install the water pump29Install the gearcaseFill with recommended type and quantity of lubricant30Check gearcase lubricant level after engine has been runChange the lubricant after 10 hours of operation (break-in period)FOR WARD