Suzuki outboard motors 1988 2003 repair manual., Page 271Get this manual
LOWER UNIT 8-3 Step 3
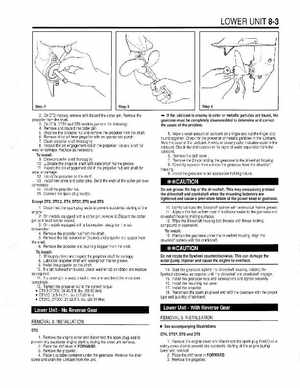
2On DT2 models, remove and discard the cotter pinRemove the propeller from the shaft3On DT4, DT5Y and DT6 models, perform the following: 4Remove and discard the cotter pin5Unscrew the propeller nut and remove the propeller from the shaft6Remove drive pin from propeller with an appropriate punch 7Clean propeller shaft thoroughly8Inspect the pin engagement slot in the propeller hub and shaft for wear or damageReplace as necessaryTo install: 9Clean propeller shaft thoroughly10Lubricate the propeller shaft with waterproof marine grease11Inspect the pin engagement slot in the propeller hub and shaft for wear or damage12Install the propeller on the shaft 13Install new drive and cotter pinsBend the ends of the cotter pin over completely14Install the propeller nut15Connect the spark plug lead(s)Step 4
If the lubricant is creamy in color or metallic particles are found, the gearcase must be completely disassembled to determine and correct the cause of the problem5Wipe small amount of lubricant on finger and rub the finger and thumb togetherCheck for the presence of metallic particles in the lubricantNote the color of the lubricantA white or creamy color indicates water in the lubricantCheck the drain container for signs of water separation from the lubricant6Remove the bolt cover7Remove the nuts holding the gearcase to the driveshaft housing 8Carefully separate then remove the gearcase from the driveshaft housing9Install the gearcase in an appropriate holding fixtureExcept DT2, DT2.2, DT4, DT5Y, DT6 and DT8 1Disconnect the spark plug leads to prevent accidental starting of the engine2On models equipped with cotter pin, remove itDiscard the cotter pin as it must not be reused3On models equipped with lockwasher, straighten the tab lockwasher4Remove the propeller nut from the shaft5Remove the tab lockwasher (if used) and propeller nut spacer from the shaft6Remove the propeller and bushing stopper from the shaftTo install: 7Throughly clean and inspect the propeller shaft for damage8Lubricate propeller shaft with waterproof marine grease9Install the propeller on the shaft10If tab lockwasher is used, check washer tab condition and replace as required11If cotter pin is usedinstall new one and bend the ends over completely12Tighten the propeller nut to the correct torque: DT9.9-DT200: 36-43.5 ftIbs(50-60 Nm) DT15C:12.5-14.5 ftIbs(17-20 Nm) DT25C, DT30C: 21-22.5 ftIbs(29-31 Nm)