Suzuki outboard motors 1988 2003 repair manual., Page 134Get this manual
5-22 IGNITION AND ELECTRICAL SYSTEMS 10After the flywheel is removed, remove the stator base retaining screws and lift of the stator assembly, 11, Remove the coils from the from the stator baseTo install: 12lnstall the coils onto the stator plate13lnstall the stator base on the engine -Make sure that the stator's alignment mark is in line with the stopper's alignment mark16171819lnstall the starter pulley onto the flywheellnstall the recoil starter assemblyConnect the battery negative battery cablelnstall the engine coverDT35 and DT40
14lnstall the key securely into the crankshaft keyway15lnstall the flywheel onto the crankshaft16Using the flywheel holder, tighten the flywheel nut to 58-65 ftlbs(80-90 Nm) 17lnstall the starter motor back onto the engine and securely tighten the bolts (if equipped)18Reconnect the starterlbattery cables and reconnect the neutral safety switch lead wire19lnstall the recoil starter assembly (if equipped) 20Connect the stator wires making sure all connections are free from corrosion and are securely fastened21lnstall the engine cover DT25 and DT30
# See accompanying illustrations
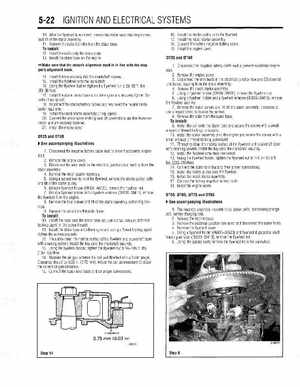
Disconnect the negative battery cable lead to prevent accidental engine start2Remove the engine cover3Disconnect the wire leads in the electrical junction box, leading from the stator assembly4Remove the recoil starter assembly5Using screwdriver to hold the flywheel, remove the starter pulley bolts and lift of the starter pulley6Using flywheel holder (09930-487201, remove the flywheel nut7Using flywheel holder and flywheel remover (09930-39411), remove the flywheel from the engine8 Remove the fouscrews andof the stator assembly and wlrlng hart ness Remove the COIISfrom the stator base To install: Install the COILS onto the stator base and use small amount of thread lockng agent on the screw threads lnstall the stator base onto the englne and uslng thread locking agent, tghtenthe screws securely 12 Throughly clean the matng surface of the flywheel and crankshaft taper wth cleanng solvent lnstall the key onto the crankshaft securely 13 Usng flywheel holder, tghten flywheel nut to 94-108 ft lbs the the30-1 50 Nm) 14 Measure the alr gap between the coil and flywheelfeeler gauge Clearance should be 03 In (075 mm) Adjust the COIIas necessary to obtan the correct air aaD clearance 15conneit the stator wire leads to their proper connectionsDisconnect the negative battery cable lead to prevent accidental engine start2Remove the engine cover3Disconnect the wire leads in the electrical junction box and CDllcontrol unit holder, leading from the stator assembly4Remove the recoil starter assembly5, Using flywheel holder (09930-39520), remove the flywheel nut6Using flywheel holder and flywheel remover (09930-39410), remove the flywheel and key 7Remove the stator screws and lift off the stator assemblyIf necessary, use impact driver to loosen the screws, 8Remove the coils from the stator baseTo install: 9lnstall the coil onto the stator base and secure the screws with small amount of thread locking compound10lnstall the stator assembly onto the engine and secure the screws with small amount of thread locking compound11Throughly clean the mating surface of the flywheel and crankshaft taper with cleaning solventInstall the key onto the crankshaft securely12lnstall the flywheel onto thew crankshaft13, Using the flywheel holder, tighten the flywheel nut to 144.7-151.9 ftlbs(200-210 Nm)14, Connect the stator wire leads to their proper connections15lnstall the starter pulley onto the flywheel16lnstall the recoil starter assembly17Connect the battery negative battery cable18lnstall the engine cover DT55, DT65, DT75 and DT85