Suzuki 2-15HP outboard motors Service Manual, Page 19Get this manual
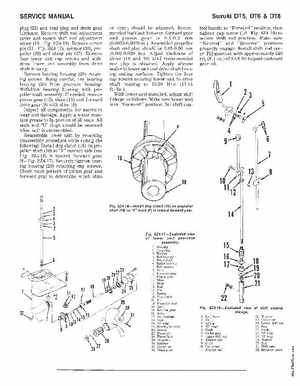
SERVICE MANUAL plug (32) and vent plug and drain gear lubricantRemoe shift rod adjustment cover and loosen shift rod adjustment screw (10FigSZ4-19)Remove cotter pin (31FigSZ4-17), spinner (30), propeller (29) and shear pin (27)Remove four lower unit cap screws and withdraw lower unit assembly from drive shaft housingRemove bearing housing (25) retaining screwsBeing careful, pry bearing housing (25) from gearcase housingWithdraw bearing housing with propeller shaft assemblyIf needed, remove pinion gear (12), shim (II) and forward drive gear (9) with shim (S)Inspect all components for excessive wear and damageApply water resistant grease to lip portion of all sealsAll seals and "0" rings should be renewed when unit is reassembledReassemble lower unit by reversing disassembly procedure while noting the following: Install dog clutch (16) on propeller shaft (IS) so "F" marked side (see FigSZ4-IS) is toward forward gear (9FigSZ4-17)Securely tighten bearing housing (25) retaining cap screwsCheck mesh pattern of pinion gear and forward gear to determine which shim or shims should be adjustedRecommended backlash between forward gear and pinion gear is 0.1-0.2 mm (0.0039-0.0079 inAssembled propeller shaft end play should be 0.05-0.50 mm (0.002-0.020 inAdjust thickness of shims (10 and 19) until recommended end play is obtainedApply silicone sealer to lower unit and drive shaft housing mating surfacesTighten the four cap screws securing lower unit to drive shaft housing to 15-20 N'm (11-15 ftIbs With lower unit installedadjust shift linkage follows: Make sure lower unit is in "Forward' positionSet shift con-