Mercury Mariner Service Manual 6, 8, 9.9 210CC Sailpower, Page 30Get this manual
6Remove parts from shaft, as shown Testing Motor Armature
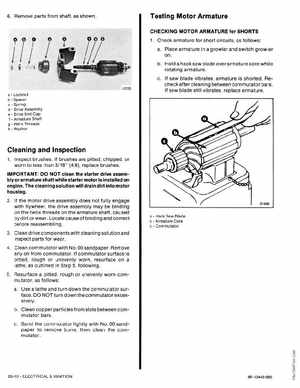
CHECKING MOTOR ARMATURE for SHORTS
1Check armature for short circuits, as follows:
aPlace armature in growler and switch growler onbHold hack saw blade over armature core while rotating armaturec If saw blade vibrates, armature is shortedRecheck after cleaning between commutator barsIf saw blade still vibrates, replace armature
aLocknutSpacerSpringDrive AssemblyDrive End CapArmature ShaltHelix ThreadsWasher
Cleaning and Inspection
1Inspect brushes If brushes are pittedchippedor worn to less than 316" (4.8)replace brushesIMPORTANT: DO NOT clean the starter drive assembly or armature shaft while starter motor is installed on engineThe cleaning solution will drain dirt into motor housing
2If the motor drive assembly does not fully engage with flywheelthe drive assembly may be binding on the helix threads on the armature shaftcaused by dirt or wearLocate cause of binding and correct before reassembling3Clean drive components with cleaning solution and inspect parts for wear4Clean commutator with No00 sandpaperRemove any oil from commutatorIf commutator surface is pittedrough or unevenly worn, resurface on lathe, as outlined in Step 5, following 5Resurface pittedrough or unevenly worn commutator, as follows: aUse lathe and turn down the commutator surfaceDO NOT turn down the commutator excessivelybClean copper particles from slots between commutator barsc Sand the commutator lightly with No00 sandpaper to remove burrsthen clean the commutator