Mercury Mariner Outboard 225 3 Litre Service Manual 1994, Page 350Get this manual
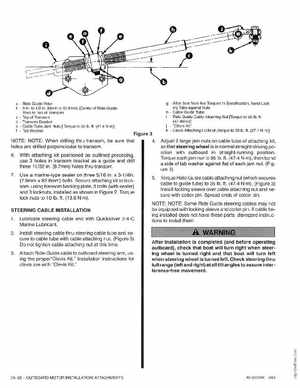
Figure NOTE: NOTE: When drilling thru transom, be sure that 4Adjust large jam nuts on cable tube of attaching kit, holes are drilled perpendicular to transomso that steering wheel is in normal straight-driving position with outboard in straight-running position6With attaching kit positioned as outlined preceding, Torque each jam nut to 35 lbft(47.4 Nm), then bend use holes in transom bracket as guide and drill side of tab washer against flat of each jam nut(Figthree 11 32 in (B.7mm) holes thru transomure 3) 7Use marine-type sealer on three 516 inx 3- 14in 5Torque Ride-Gu ide cable attaching nut (wh ich secures (7.9mm 82 .6mm) boltsSecure attaching kit to trancable to guide tube) to 35 lbfl (47.4 Nm)(Figure 3) som, using transom backing platebolts (with sealer) Install locking sleeve over cable attaching nut and seand locknuts, installed as shown in Figure 2Torque cure with cotter pinSpread ends of cotter pinlock nuts to 10 lbft(13.6 Nm)NOTE: NOTE: Some Ride Guide steeri ng cables may not be equipped with locking sleeve and cotter pin If cable STEERING CABLE INSTALLATION ing installed does not have these parts, disregard instruc1Lubricate steering cable end with Quicksilver 2-4-C tions to install them Marine Lubricant2Install steering cable thru steering cable tube and secure to cable tube with cable attaching nut(Figure 3) Do not tighten cable attaching nut at this timeAttach Ride-Guide cable to outboard steering arm, using the proper"Clevis Kit Installation instructions for clevis are with "Clevis KitaRide-Guide Yoke into 12 in(Omm to 12.8mm) (Center of RideGuide Yoke to Top of TransomTop of TransomTransom BracketCable Tube Jam Nuts [Torque 351bft (47.4 N'm)]Tab Washer