Mercury Mariner 200, 225 Optimax Outboards Service Manual, 90-855348, Page 369Get this manual
SHIFT SPOOL ASSEMBLY (NON-RATCHETING)Component Reassembly and Adjustment 1Assemble the shift spool and shift spool shaft as follows: aPlace the shift spool onto the shift spool shaftbAssemble the castle nut and screw it down until it touches the washer and slight resistance is feltcLoosen the castle nut until the cotter pin slot of the castle nut is aligned with the hole in the shaftIf, when the castle nut is screwed down, the cotter pin slot is already aligned at the hole in the shaft, back the castle nut off until the next available slot in the nut is aligned with the hole in the shaft Propeller Shaft Assembly
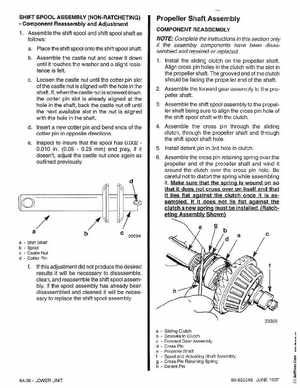
COMPONENT REASSEMBLY NOTE: Complete the instructions in this section only if the assembly components have been disassembled and repaired or replaced1Install the sliding clutch on the propeller shaftAlign cross pin holes in the clutch with the slot in the propeller shaftThe grooved end of the clutch should be facing the propeller end of the shaft2Assemble the forward gear assembly to the propeller shaft3Assemble the shift spool assembly to the propeller shaft being sure to align the cross pin hole of the shift spool shaft with the clutch4Assemble the cross pin through the sliding clutch, through the propeller shaft and through the shift spool shaft hole5Install detent pin in 3rd hole in clutch6Assemble the cross pin retaining spring over the propeller end of the propeller shaft and wind it around the clutch over the cross pin holeBe careful not to distort the spring while assembling itMake sure that the spring is wound on so that it does not cross over on itself and that it lies flat against the clutch once it is assembledIf it does not lie flat against the clutch new spring must be installed(Ratcheting Assembly Shown)