Mercury Electric Outboards 222 Thruster Service Manual, Page 19Get this manual
SECTIONLOWER UNIT PartMotor Assembly DISASSEMBLY of MOTOR ASSEMBLY
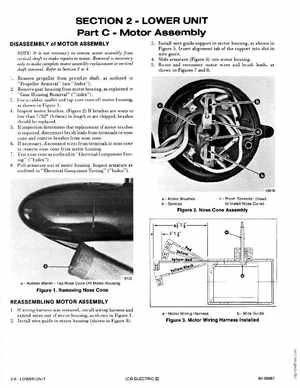
NOTE: It is not necessary to remove motor assembly from vertical shaft to make repairs to motorRemoval is necessary only to make complete motor assembly replacement or vertical shaft removalRefer to Section or 43Install wire guide support in motor housing, as shown in Figure 5Insert alignment tab of the support into slot in wire guide4Slide armature (Figure 6) into motor housing5Route and reconnect motor wires and brush leads, as shown in Figures and 8
1Remove propeller from propeller shaft, as outlined in
"Propeller Removal" (see "Index")2Remove gear housing from motor housing, as explained in "Gear Housing Removal" ("Index")3Use rubber mallet and tap nose cone off motor housing, as shown in Figure 14Inspect motor brushes(Figure 2) If brushes are worn to less than 732" (S.6mm) in length or are chipped, brushes should be replaced5If inspection determines that replacement of motor brushes is required, disconnect brush leads from terminals in nose cone and remove brushes from nose cone6If necessary, disconnect wires from terminals in nose cone to remove nose cone from motor housing7Test nose cone as outlined in "Electrical Component Testing" ("Index")8Pull armature oui of motor housingInspect armature as outlined in "Electrical Component Testing" ("Index")