1995 Johnson/Evinrude Outboards 50 thru 70 3-cylinder Service Manual, Page 151Get this manual
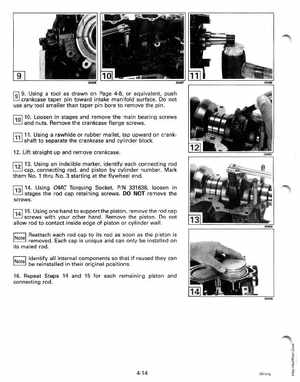
Inl 9Using tool as drawn on Page 4-8, or equivalent, push crankcase taper pin toward intake manifold surfaceDo not use any tool smaller than taper pin bore to remove the pin
r,Ql 10Loosen in stages and remove the main bearing screws and nutsRemove the crankcase flange screwsf11l 11Using rawhide or rubber mallet, tap upward on crankshaft to separate the crankcase and cylinder block12Lift straight up and remove crankcase12 13Using an indelible marker, identify each connecting rod cap, connecting rod, and piston by cylinder numberMark them No.1 thru No.3 starting at the flywheel endf131 14Using OMC Torquing Socket, PIN 331638, loosen in stages the rod cap retaining screwsDO NOT remove the screws1141 15Using one hand to support the piston, remove the rod cap screws with your other handRemove the pistonDo not allow rod to contact inside edge of piston or cylinder wallReattach each rod cap to its rod as soon as the piston is removedEach cap is unique and can only be installed on its mated rod Identify all internal components so that if reused they can be reinstalled in their original positions16Repeat Steps 14 and 15 for each remaining piston and connecting rod30499