1993 Johnson Evinrude "ET" 9.9 thru 30 Service Manual, P/N 508282, Page 159Get this manual
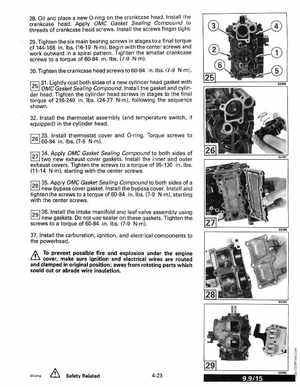
28Oil and place new O-ring on the crankcase headInstall the crankcase headApply OMC Gasket Sealing Compound to threads of crankcase head screwsInstall the screws finger tight29Tighten the six main bearing screws in stages to final torque of 144-168 inIbs(16-19 Nm)Begin with the center screws and work outward in spiral patternTighten the smaller crankcase screws to torque of 60-84 inIbs(7-9 Nm)30Tighten the crankcase head screws to 60-84 inIbs(7-9 Nm)r;;l 31Lightly coat both sides of new cylinder head gasket with OMC Gasket Sealing CompoundInstall the gasket and cylinder headTighten the cylinder head screws in stages to the final torque of 216-240 inIbs(24-27 Nm), following the sequence shown32Install the thermostat assembly (and temperature switch, if equipped) in the cylinder head1261 33Install thermostat cover and O-ringTorque screws to 60-84 inIbs(7-9 Nm)r:;:;l 34Apply OMC Gasket Sealing Compound to both sides of two new exhaust cover gasketsInstall the inner and outer exhaust coversTighten the screws to torque of 95-130 in.lbs(11-14 Nm), starting with the center screwsr:;;l 35Apply OMC Gasket Sealing Compound to both sides of new bypass cover gasketInstall the bypass coverInstall and tighten the screws to torque of 60-84 inIbs(7-9 Nm), starting with the center screws1291 36Install the intake manifold and leaf valve assembly using new gasketsDo not use sealer on these gasketsTighten the screws to torque of 60-84 inIbs(7-9 Nm)37Install the carburetion, ignition, and electrical components to the powerhead i cover, make sure ignition and electrical wires are routed