1993 Johnson Evinrude "ET" 60 degrees LV Service Manual, P/N 508286, Page 141Get this manual
13 DR3483
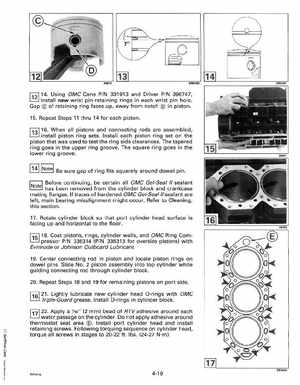
r:;] 14Using OMC Cone PIN 331913 and Driver PIN 396747, install new wrist pin retaining rings in each wrist pin holeGap of retaining ring faces up, away from notch in piston
15Repeat Steps 11 thru 14 for each piston [":;:;1 16When all pistons and connecting rods are assembled, install piston ring setsInstall each piston ring set on the piston that was used to test the ring side clearances The tapered ring goes in the upper ring grooveThe square ring goes in the lower ring groove1141 1Notel Be sure gap of ring fits squarely around dowel pinBefore continuing, be certain all OMC Gel-Seal" sealant has been removed from the cylinder block and crankcase mating flangesIf traces of hardened OMC Gel-Seal" sealant are left, main bearing misalignment might occurRefer to Cleaning, this section17Rotate cylinder block so that port cylinder head surface is facing up and horizontal to the floorr:t5l 18Coat pistons, rings, cylinder walls, and OMC Ring Compressor PIN 336314 (PIN 336313 for oversize pistons) with Evinrude or Johnson Outboard Lubricant19Center connecting rod in piston and locate piston rings on dowel pinsSlide No.2 piston assembly into top cylinder while guiding connecting rod through cylinder block20Repeat Steps 18 and 19 for remaining pistons on port side1161 21Lightly lubricate new cylinder head O-rings with OMC Triple-Guard greaseInstall O-rings in cylinder blockf171 22Apply 1 16" (2 mm) bead of RTV adhesive around each water passage on the cylinderDo not apply adhesive around thermostat seat area Install port cylinder head and install retaining screwsFollowing torquing sequence on cylinder head, torque all screws in stages to 20-22 ftIbs(24-27 Nm)