1992 Johnson Evinrude "EN" 60 thru 70 Service Manual, P/N 508144, Page 340Get this manual
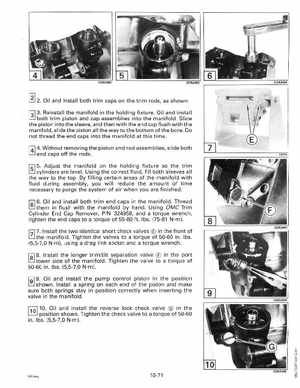
2Oil and install both trim caps on the trim rods, as shownf31 3Reinstall the manifold in the holding fixtureOil and install both trim piston and cap assemblies into the manifoldSlide the piston into the sleeve, and then with the end cap flush with the manifold, slide the piston all the way to the bottom ofthe boreDo not thread the end caps into the manifold at this time4Without removing the piston and rod assemblies, slide both end caps off the rodsr-] 5Adjust the manifold on the holding fixture so the trim cylinders are levelUsing the correct fluid, fill both sleeves all the way to the topBy filling certain areas of the manifold with fluid during assembly, you will reduce the amount of time necessary to purge the system of air when you are finished f61 6Oil and install both trim end caps in the manifoldThread them in flush with the manifold by handUsing OMC Trim Cylinder End Cap Remover, PIN 324958, and torque wrench, tighten the end caps to torque of 55-60 ftIbs(75-81 Nm)rJl 7Install the two identical short check valves in the front of the manifoldTighten the valves to torque of 50-60 inIbs(5,5-7,0 Nm), using drag link socket and torque wrenchf81 8Install the longer trimtilt separation valve in the port lower side of the manifoldTighten the valve to torque of 50-60 inIbs(5,5-7,0 Nm)Oil and install the pump control piston in the position shownInstall spring on each end of the piston and make sure both springs stay in position correctly when inserting the valve in the manifoldr;Ql 10Oil and install the reverse lock check valve in the position shownTighten the check valve to torque of 50-60 inIbs(5,5-7,0 Nm)