1990 Johnson Evinrude "ES" 40 thru 55, P/N 507872, Page 221Get this manual
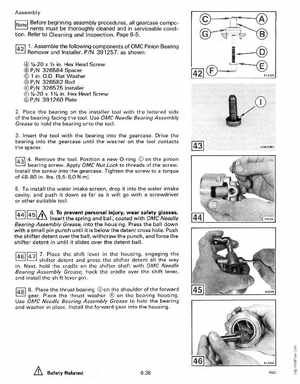
Assembly INotel Before beginning assembly procedures, all gearcase components must be thoroughly cleaned and in serviceable condition Refer to Cleaning 'a nd Inspection, Page 6-5 1421 1Assemble the following components of OMC Pinion Bearing
Remover and Installer, PIN 391257, as shown: '
-20 inHex Head Screw PIN 326584 Spacer in .0Flat Washer
PIN 326582 Rod PIN 326575 Installer -20 inHex Head Screw PIN 391260 Plate
2Place the bearing on the installer tool with the lettered side of the bearing facing the toolUse OMC Needle Bearing Assembly Grease to hold the bearing onto the tool3Insert the tool with the bearing into the gearcaseDrive the bearing into the gearcase until the washer on the tool contacts the spacer
Remove the toolPosition new O-ring CD on the pinion bearing screwApply OMC Nut Lock to threads of the screwInstall the screw into the gearcaseTighten the screw to torque of 48-80 inIbs(5,5 -9,0 Nm)
5To install the water intake screen, drop it into the water intake cavity, and push it down as far as it will go with screwdriver or other suitable tool6To prevent personal injury, wear safety glassesInsert the spring and ball, coated with OMC Needle Bearing Assembly Grease, into the housingPress the ball down with small pin punch until it is below the detent cross holePush the shifter detent over the ball, withdraw the punch, and force the shifter detent in until it slides over the detent ballshift lever in the housing, engaging the shifter detent and press the shifter detent all the way in Next, hold the cradle on the shifter shaft with OMC Needle Bearing Assembly Grease, hook the cradle over the shift lever, and install the shift lever pinPlace the thrust bearing Q) on the shoulder of the forward gearPlace the thrust washer on the bearing housingUse OMC Needle Bearing Assembly Grease to hold the bearing and washer in placeInstall the forward gear into the housing