1990 Johnson Evinrude 120 thru 140, 185 thru 225, 300 HP, P/N 507875, Page 264Get this manual
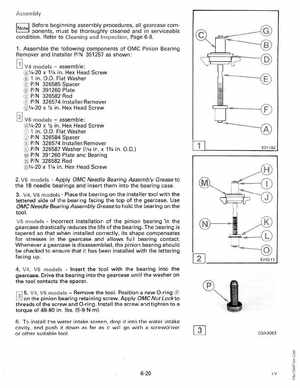
Assembly Before beginning assembly procedures, all gearcase components, must be thoroughly cleaned and in serviceable conditionRefer to Cleaning and Inspection, Page 6-81Assemble the following components of OMC Pinion Bearing Remover and Installer PI 391257 as shown:] V4 modelsassemble: 1f4-20 1114 inHex Head Screw in0.0Flat Washer PI 326585 Spacer PI 391260 Plate PI 326582 Rod PI 3265741nstallerRemover 1f4-20 112 in Hex Head Screw V6 modelsassemble: 1f4-20 112 inHex Head Screw CD in0.0Flat Washer Q) PI 326584 Spacer PI 326574 Installerl Remover CD PI 326587 Washer (1116 inx in0.0 PI 391260 Plate and Bearing PI 326582 Rod 1f4-20 1114 inHex Head Screw 2V6 modelsApply OMC Needle Bearing Assembly Grease to the 18 needle bearings and insert them into the bearing case3V4, V6 modelsPlace the bearing on the installer tool with the lettered side of the bearing facing the top of the gearcaseUse OMC Needle Bearing Assembly Grease to hold the bearing on the toolV6 modelsIncorrect installation of the pinion bearing in the gearcase drastically reduces the life of the bearingThe bearing is tapered so that when installed correctly, its shape compensates for stresses in the gearcase and allows full bearing contactWhenever gearcase is disassembled, the pinion bearing should be checked to ensure that it has been installed with the lettering facing up4V4, V6 modelsInsert the tool with the bearing into the gearcaseDrive the bearing into the gearcase until the washer on the tool contacts the spaceron the pinion bearing retaining screwApply OMC Nut Loekto threads of the screw and a-ringInsta" the screw and tighten to torque of 48-80 inIbs(5-9 Nm)6To install the water intake screen, drop it into the water intake cavity, and push it down as far as it will go with screwdriver or other suitable tool 824182