1990 Johnson Evinrude 120 thru 140, 185 thru 225, 300 HP, P/N 507875, Page 202Get this manual
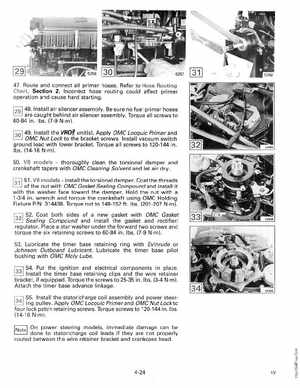
47 Route and connect all primer hosesRefer to Hose Routing Chart, Section 2Incorrect hose routing could affect primer operation and cause hard starting1291 48Install air silencer assemblyBe sure no fuel primer hoses are caught behind air silencer assemblyTorque all screws to 60-84 inIbs(7-9 Nm)1301 49Install the unit{s)Apply OMC Locquic Primer and OMC Nut Lock to the bracket screwsInstall vacuum switch ground lead with lower bracketTorque all screws to 120-144 inIbs(14-16 Nm)50V8 modelsthoroughly clean the torsional damper and crankshaft tapers with OMC Cleaning Solvent and let air dryrJ1l 51V8 modelsinstall the torsional damperCoat the threads of the nut with OMC Gasket Sealing Compound and install it with the washer face toward the damperHold the nut with 1-34 inwrench and torque the crankshaft using OMC Holding Fixture PI 314438Torque nut to 148-152 ftIbs(201-207 Nm)r:;l 52Coat both sides of new gasket with OMC Gasket Sealing Compound and install the gasket and rectifier regulatorPlace star washer under the forward two screws and torque the six retaining screws to 60-84 inIbs(7-9 Nm)53Lubricate the timer base retaining ring with Evinrude or Johnson Outboard LubricantLubricate the timer base pilot bushing with OMC Moly Luber:;:;] 54Put the ignition and electrical components in placeInstall the timer base retaining clips and the wire retainer bracket, if equippedTorque the screws to 25-35 inIbsNm)Attach the timer base advance linkage1341 55Install the statorcharge coil assembly and power steering pulleyApply OMC Locquic Primer and OMC Nut Lock to four lock patch retaining screwsTorque screws to 120-144 inIbs(14-16 Nm) INotel On power steering models, immediate damage can be done to statorcharge coil leads if they are not properly routed between the wire retainer bracket and crankcase head