1989 Johnson Evinrude "CE" 9.9 thru 30 Service Manual, P/N 507754, Page 78Get this manual
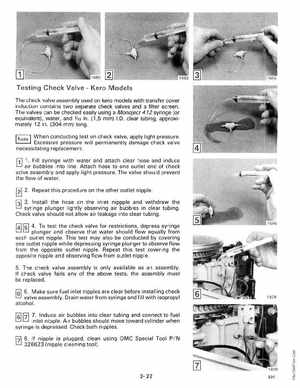
Testing Check ValveKero Models The check valve assembly used on kero models with transfer cover induction contains two separate check valves and filter screenThe valves can be checked easily using Monoject 412 syringe (or equivalent), water, and V16 in (1,5 mm) I.Dclear tubing, approximately 12 in(304 mm) long
INote When conducting test on check valve, apply light pressure
Excessive pressure will permanently damage check valve necessitating replacement
f1l 1Fill syringe with water and attach clear hose and induce air bubbles into lineAttach hose to one outlet end of check valve assembly and apply light pressureThe valve should prevent the flow of water2Repeat this procedure on the other outlet nipple3Install the hose on the inlet nippple and withdraw the syringe plunger lightly observing air bubbles in clear tubingCheck valve should not allow air leakage into clear tubing To test the check valve for restrictions, depress syringe plunger and observe that water should flow equally from each outlet nippleThis test may also be conducted by covering one outlet nipple while depressing syringe plunger to observe flow from the opposite outlet nippleRepeat this test covering the opposite nipple and observing flow from outlet nipple5The check valve assembly is only available as an assemblyIf check valve fails any of the above tests, the assembly must be replaced