1988 Johnson/Evinrude "CC" 40 thru 55 Models Service Manual, Page 114Get this manual
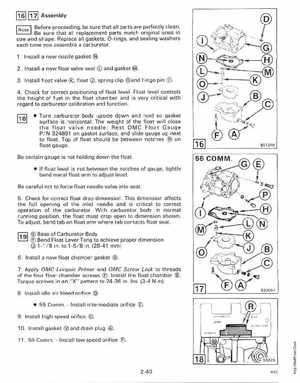
11611171 Assembly Before proceeding, be sure that all parts are perfectly cleanBe sure that all replacement parts match original ones in size and shape Replace all gaskets, O-rings, and sealing washers each time you assemble carburetor1Install new nozzle gasket 2Install new float valve seat 3Install float valve
and gasket clip and hinge pin
, float Q), spring
4 Check for correct positioning of float levelFloat level controls the height of fuel in the float chamber and is very critical with regard to carburetor calibration and function Turn carburetor body upside down and hold so gasket surface is horizontalThe weight of the float will close the float valve needleRest OMC Float Gauge P 324891 on gasket surface, and slide gauge up next to floatTop of float should be between notches on float gaugeBe certain gauge is not holding down the float If float level is not between the notches of gauge, lightly bend metal float arm to adjust levelBe careful not to force float needle valve into seat Check for correct float drop dimensionThis dimension affects the full opening of the inlet needle and is critical to correct operation of the carburetorWith carburetor body in normal running position, the float must drop open to dimension shown To adjust, bend tab on float arm where tab contacts float seat