1985 OMC 65, 100 and 155 HP Models Commercial Service Manual, PN 507450-D, Page 278Get this manual
INotel tapers on both partspinion to the driveshaft, degrease Before assembling the 1Install the pinion and pinion nut onto the driveshaftTighten the pinion nut to torque of 54-60 Nm (40-45 ftIbs2Assemble the driveshaft bearing housing ,thrust washer onto the driveshaft
and thrust bearing
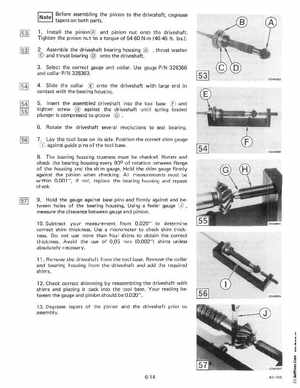
3Select the correct gauge and collarUse gauge PIN 328366 and collar PIN 328363COA3593
4Slide the collar onto the driveshaft with large end in contact with the bearing housing5Insert the assembled driveshaft into the tool base and tighten screw against the driveshaft until spring loaded plunger is compressed to groove 6Rotate the driveshaft several revolutions to seat bearing
7 Lay the tool base on its sidePosition the correct shim gauge CD against guide pins of the tool base8The bearing housing trueness must be checkedRotate and check the bearing housing every 900 of rotation between flange of the housing and the shim gaugeHold the shim gauge firmly against the pinion when checkingAll measurements must be within 0.001", if not, replace the bearing housing and repeat check9Hold the gauge against base pins and firmly against and between holes of the bearing housingUsing feeler gauge Q)measure the clearance between gauge and pinion 10Subtract your measurement from 0.020" to determine correct shim thicknessUse micrometer to check shim thicknessDo not use more than four shims to obtain the correct thicknessAvoid the use of 0,05 mm (0.002") shims unless absolutely necessary11Remove the driveshaft from the tool baseRemove the collar and bearing housing from the driveshaft and add the required shims12Check correct shimming by reassembling the driveshaft with shims and placing it back into the tool baseYour reading between the gauge and pinion should be 0.020"13Degrease tapers of the pinion and the driveshaft prior to assembly