1985 OMC 65, 100 and 155 HP Models Commercial Service Manual, PN 507450-D, Page 162Get this manual
Ignition Coil Replacement65 and 155 Models Removal 1Separate the four-wire connector between the power pack and ignition coils2Twist and pull on the cover to remove the high tension lead from the ignition coil3Release the ignition coil wires from the support clamps, and remove the coil mounting screws4Remove the ignition coil terminal from the four-wire connectorInstallation
Insert the ignition coil terminal into the four-wire connector
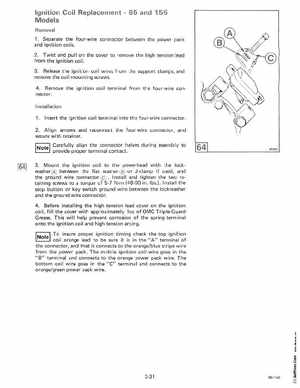
2Align arrows and reconnect the four-wire connector, and secure with retainerCarefully align the connector halves during assembly tode proper term contactproVI Ina 3Mount the ignition coil to the powerhead with the lockwasher between the flat washer or J-clamp if used, and the ground wire connector Install and tighten the two re taining screws to torque of 5-7 Nm (48-60 inIbsInstall the stop button or key switch ground wire between the lockwasher and the ground wire connector4Before installing the high tension lead cover on the ignition coil, fill the cover with approximately 1cc of OMC Triple-Guard GreaseThis will help prevent corrosion of the spring terminal onto the ignition coil and high tension arcingTo insure ignition timing check the top ignition coil orange lead to be sure it is in the "A" terminal of the connector, and that it connects to the orangeblue stripe wire from the power packThe middle ignition coil wire goes in the "B" terminal and connects to the orange power pack wireThe bottom coil wire goes in the "c" terminal and connects to the orangegreen power pack wire