1978 Johnson 175, 200, 235 HP Outboard Service Manual, Page 184Get this manual
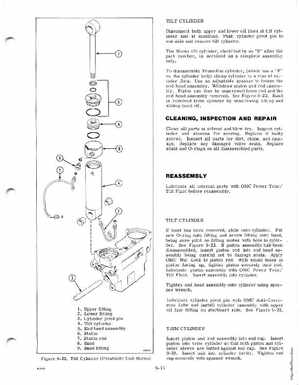
TILT CYLINDER Disconnect both upper and lower oil lines at tilt cylinder and at manifoldPush cylinder pivot pin to one side and remove tilt cylinderThe Showa tilt cylinder, identified by an "S" after the part number, is serviced as complete assembly only To disassemble Prestolite cylinder, (which has" on the cylinder body) clamp cylinder in vise at cylinder flatsUse an adjustable spanner to loosen the end head assemblyWithdraw piston and rod assembly Piston can then be unscrewed from rod and the end head assembly removedSee Fi gur -22Band is removed from cylinder by unscrewing fitting and Sliding band off CLEANING, INSPECTION AND REPAIR
Clean all parts in solvent and blow dryInspect cylinder and sleeves for scoringReplace if badly scoredInspect all parts for dirt, chips, and damageReplace any damaged valve seatsReplace seals and O-rings on all disassembled parts
REASSEMBLY
Lubricate all internal parts with OMC Power Trim Tilt Fluid before reassembly
TILT CYLINDER Put new O-ring onto fitting and screw fitting onto band, being sure pilot on fitting mates with hole in cylinderSee Figure 9-22If piston assembly has been disassembled, insert piston rod into end head assembly being careful not to damage sealsApply OMC Nut Lock to piston rodWith small holes in piston faCing up, tighten piston securely onto rod Lubricate piston assembly with OMC Power Trim Tilt FluidInsert assembly into cylinderTighten end head assembly onto cylinder using spanner wrenchLubricate cylinder pivot pin with OMC Anti-Corrosion Lube and install cylinder assembly with upper oil line fitting on starboard sideSee Figure 9- 22If band has been removed, slide onto cylinder