1972 Evinrude StarFlire 125 HP Outboards Service Manual, PN 4822, Page 79Get this manual
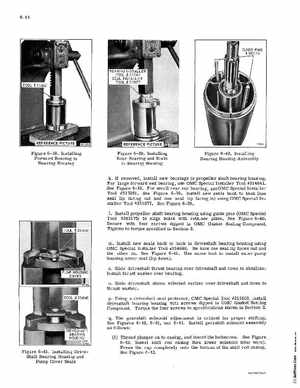
Figure 6-38Installing Forward Bearing in Bearing Housing
Figure 6-39Installing Rear Bearing and Seals in Bearing Housing
Figure 6-40Installing Bearing Housing Assembly
kIf removedinstall new bearings in propeller shaft bearing housingFor large forward end bearing, use OMC Special Installer Tool #314641See Figure 6-38For small rear end bearing, useOMC Special Installer Tool #317061See Figure 6-39Install new seals back to back (one seal lip facing out and one seal lip facing in) using OMC Special Installer Tool #311877See Figure 6-391Install propeller shaft bearing housing using guide pins (OMC Special Tool #383175) to align holes with retainer plateSee Figure 6-40Secure with four screws dipped in OMC Gasket Sealing CompoundTighten to torque specified in Section 2mInstall new seals back to back in driveshaft bearing housing using OMC Special Installer Tool #314640Be sure one seal lip faces out and the other inSee Figure 6- 41Use same tool to install water pump housing cover seal (lip down)nSlide driveshaft thrust bearing over driveshaft and down to shoulderInstall thrust washer over bearingoSlide driveshaft shims selected earlier over driveshaft and down to thrust washerpUSing driveshaft seal protector, OMC Special Tool #312403, install clriveshaft bearing housing with screws dipped in OMC Gasket Sealing CompoundTorque the four screws to specifications shown in Section 2qThe gearshift solenoid adjustment is critical for proper shiftingSee Figures 6-42, 6-43, and 6-44Install gearshift solenoid assembly as follows: (1) Thread plunger on to casing, and insert the lockscrewSee Figure .6-43Insert shift rod casing thru lower solenoid (blue wire)Press the cap completely onto the bottom of the shift rod casingSee Figure 6-42E u