1972 Evinrude StarFlire 125 HP Outboards Service Manual, PN 4822, Page 78Get this manual
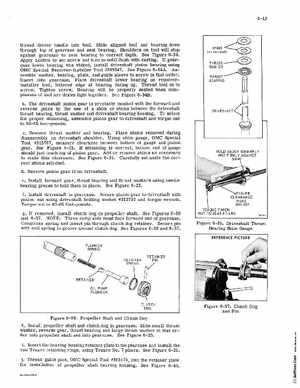
thread driver handle into toolSlide aligned tool and bearing down through top of gear case and seat bearingShoulders on tool will stop against gearcase to seat bearing to correct depthSee Figure 6-34Apply Loctite to set screw and turn in until flush with castingIf gearcase lower bearing was staked, install driveshaft pinion bearing using OMC Special Remover-Installer Tool #385547See Figure 6-34AAssemble washer, bearing, plate, and guide sleeve to screw in that orderInsert into gearcasePlace driveshaft lower bearing on removerinstaller tool, lettered edge at bearing facing upThread tool on to screwTighten screwBearing will be properly seated when components of tool are drawn tight togetherSee Figure 6-34BbThe driveshaft pinion gear is precisely meshed with the forward and reverse gears by the use of shim or shims between the driveshaft thrust bearing, thrust washer and driveshaft bearing housingTo select the proper shimming, assemble pinion gear to driveshaft and torque nut to 60-65 foot-poundscRemove thrust washer and bearingPlace shims removed during disassembly on driveshaft shoulderUsing shim gauge, OMC Special Tool #315767, measure clearance between bottom of gauge and pinion gearSee Figure 6-35If shimming is correct, bottom end of gauge should just touch top of pinion gearAdd or remove shims as necessary to make this clearanceSee Figure 6-35Carefully set aside the correct shims selecteddRemove pinion gear from driveshafteInstall forward gear, thrust bearing and-thrust washers using needle bearing grease to hold them in placeSee Figure 6-23fInstall driveshaft in gearcaseSecure pinion gear to driveshaft with pinion nut USing driveshaft holding socket #312752 and torque wrenchTorque nut to 60-65 foot-pounds