Honda B75K2-B75K3 Outboard Motors Manual., Page 17Get this manual
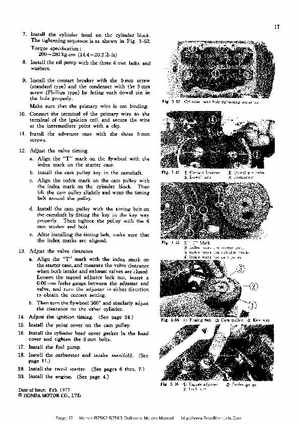
Install the cylinder head on the cylinder block, The tightening sequence is as shown in Fig3-52Torque specification200-280 kg-cm (14.4-20.2 1b-ft) Install the oil pump with the three mm bolts and washersInstall the contact breaker with the mm screw (standard type) and the condenser with the mm screw (Phillips type) by fitting each dowel pin in the hole properlyMake sure that the primary wire is not bindingConnect the terminal of the primary wire to the terminal of the ignition coil, and secure the wire at the intermediate point with clipInstall the advancer case with the three mm screwsAdjust the valve timingaAlign the "T" mark on the flywheel with the index mark on the starter casebInstall the cam pulley key in the camshaftcAlign the index mark on the cam pulley with the index mark on the cylinder blockThen lift the cam pulley slightly and wrap the timing belt around the pulleydInstall the cam pulley with the timing belt on the camshaft by fitting the key in the key way properlyThen tighten the pulley with the mm washer and bolteAfter installing the timing belt, make sure that the index marks are alignedAdjust the valve clearance aAlign the "T" mark with the index mark on the starter case, and measure the valve clearance when both intake and exhaust valves are closedLoosen the tapped adjuster lock nut, insert 0.06 mm feeler gauge between the adjuster and valve, and turn the adjuster in either direction to obtain the correct settingbThen turn the flywheel 360and similarly adjust the clearance on the other cylinderAdjust the ignition timing(See page 24 Install the point cover on the cam pulleyInstall the cylinder head cover gasket in the head cover and tighten the mm boltsInstall the fuel pumpInstall the carburetor and intake manifold(See page 11 Install the recoil starter(See pages thru7 Install the engine(See page 4 Date Issue: Feb1977 f