2008 Suzuki LT-A400/F, LT-F400/F ATV Service Manual, Page 188Get this manual
1G-21 Fuel System:
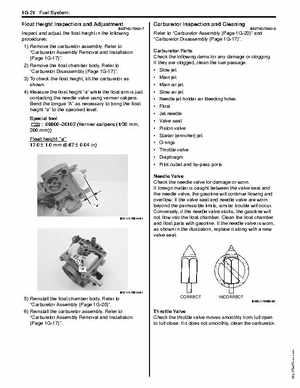
Float Height Inspection and Adjustment
Inspect and adjust the float height in the following procedures: 1) Remove the carburetor assemblyRefer to "Carburetor Assembly Removal and Installation (Page 1G-17)"2) Remove the float chamber bodyRefer to "Carburetor Disassembly (Page 1G-17)"3) To check the float height, tilt the carburetor as shown4) Measure the float height "a" while the float arm is just contacting the needle valve using vernier calipersBend the tongue "A" as necessary to bring the float height "a" to the specified levelSpecial tool0990020102 (Vernier calipers (120 mm, 200 mm)) Float height "a" 17.0 1.0 mm (0.67 0.04 in)
B827H21706017
Carburetor Inspection and Cleaning
Refer to "Carburetor Assembly (Page 1G-20)" and "Carburetor Disassembly (Page 1G-17)"
B827H21706018
Carburetor Parts Check the following items for any damage or cloggingIf they are clogged, clean the fuel passage Slow jet Main jet Main air jet Slow air jet Needle jet holder air bleeding holes Float Jet needle Valve seat Piston valve Starter (enricher) jet O-rings Throttle valve Diaphragm Pilot outlet and by-pass ports Needle Valve Check the needle valve for damage or wornIf foreign matter is caught between the valve seat and the needle valve, the gasoline will continue flowing and overflowIf the valve seat and needle valve are worn beyond the permissible limits, similar trouble will occurConversely, if the needle valve sticks, the gasoline will not flow into the float chamberClean the float chamber and float parts with gasolineIf the needle valve is worn, as shown in the illustration, replace it along with new valve seat